

Mike and I are always working on a house project. But, there are some that we like better than others. I think we both agree that tiling a shower is one of our favorites. One of the reasons we both enjoy it is because we each have our “specialties” when we tile a shower. I like spreading the thin set and laying all the tile, whereas Mike prefers the measuring and cutting. (I know, can you believe that we both prefer the exact opposite tasks? When does that ever happen? Ha! Ha!)
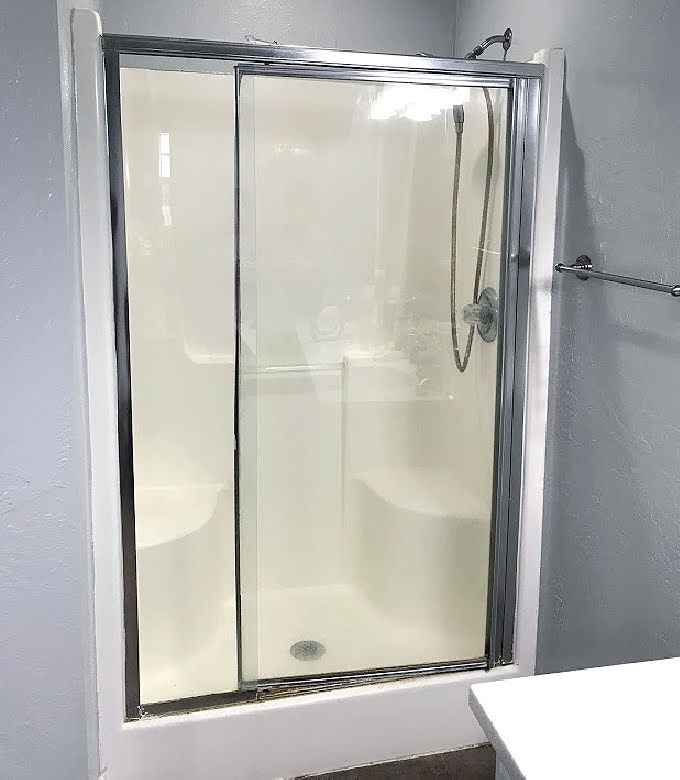
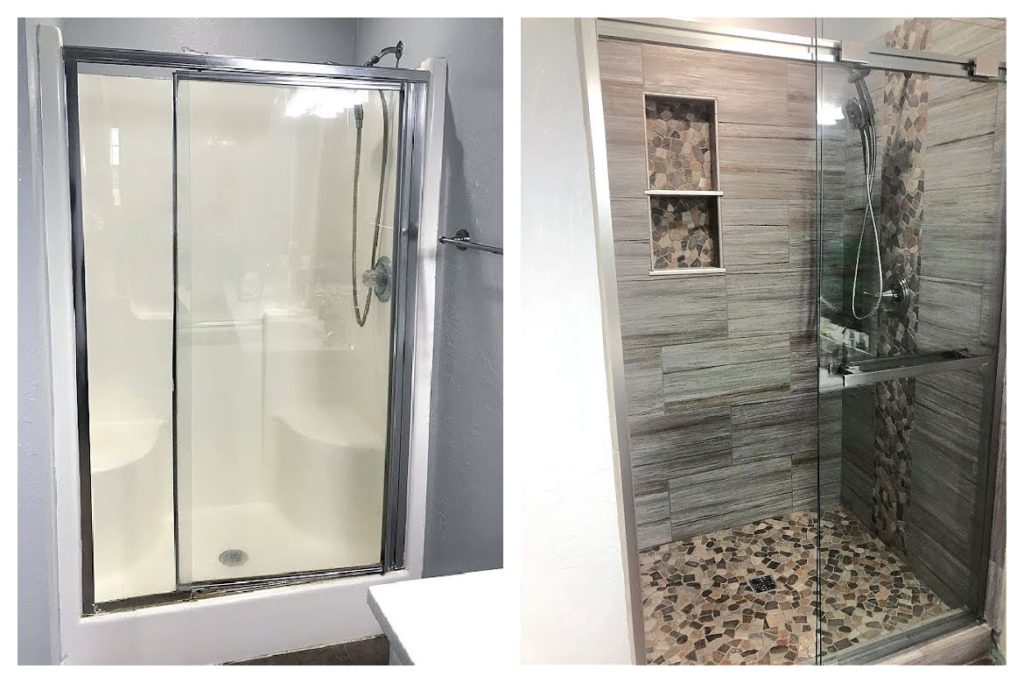
My sister and her husband live in a home that’s 15 years old. It’s a cute little house but there are some items in need of updating. The number one thing that my sister truly dislikes about her house is her master shower. It’s one of those shower inserts with a shower door that has seen its better days. I don’t know how many times I’ve heard her complain about it. (You seriously would think that it is the worst shower ever – lol! My sister exaggerates just a wee bit!)
I’ll admit, it does need updating. She definitely needs someone who knows how to tile a shower. She is also married to an extremely talented electrician who helped Mike and I with our screened in porch makeover. So, it was time to repay the favor and tile her shower for her. She was so excited when the time came to make her dream a reality. She even let Mike and I pick out all the tile!!
Here’s our starting point. Just a plain, boring shower insert with a door that apparently leeks water all over the floor when they open it.
There’s actually quite a few steps involved to get this space to the point where tile can even be applied. All of these steps require drying time in between which significantly increases the time span of tiling a shower. So, let’s tile a shower!
Shower Demo
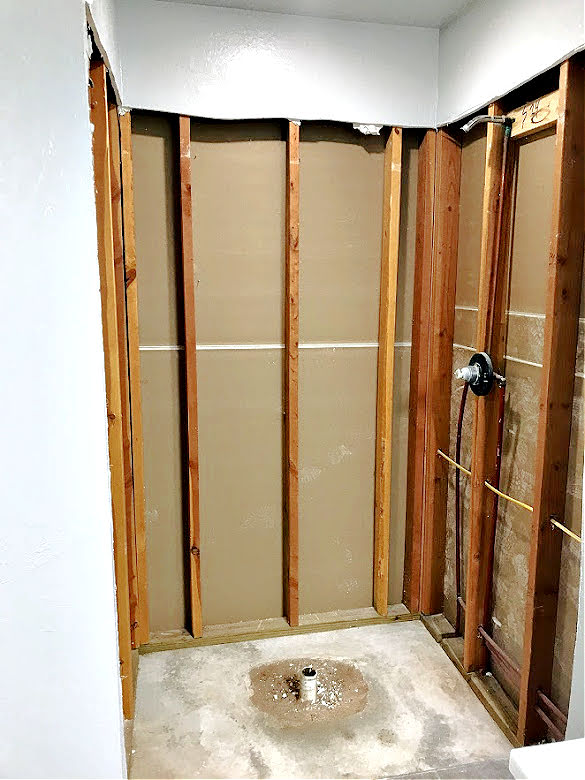
We first had to get this insert out of her bathroom. So, the shower doors came off first. These are pretty easy to remove. You just have to take a utility knife and cut the silicone from around the door. Next, you remove the screws that are along the bottom track and sides. The door then comes out pretty easy. And actually, that’s the easiest thing that you’ll do in this entire project. (LOL!) So, don’t go patting yourself on the back too hard yet.
After removing the doors, you need to remove the shower head and the shower knob. Did I mention that you need to turn off the water before you do this? It’s really a precautionary measure just in case you are overzealous in your attempt at removing these items and you break something. The last thing you need is to have water spewing all over your bathroom.
To remove the shower head, it’s just a matter of twisting it off. The hubs did use some channel locks to remove it because it was really stuck on there. Then, on the shower knob, he removed the plastic cap in the middle of the handle. The cap just popped off with a small pry of the screwdriver. Popping that off uncovered a single screw which he removed. And, “Voila!” the entire handle came off. (Well, I think he had to give it a little wiggle to coax it to come off. Mike might have actually talked to it as well. Sometimes he talks to inanimate objects to get them to cooperate. Ha! Ha! Does anyone else do this?)
The next step is to cut the sheet rock all around the insert to remove it. There is a flange (typically about an inch) all around the shower insert which rests behind the sheet rock. So, you have to cut the sheet rock at least above the flange. To cut the sheetrock, you can either use a utility knife or a drywall saw. Mike uses utility knifes for everything so this is what he used.
Once he had his cutting done, it took a little maneuvering (and some more talking to the shower insert) but it came out pretty easily. The next challenge was trying to get it out the bathroom door. Many times when homes are built, the shower inserts are put in prior to sheetrock and doors and lots of other things. So, getting the shower insert in is no problem. However, removing them after a house is completed IS a problem.
Mike ended up cutting the shower insert in two to get it out the door. He cut it with a sawzall. (That’s what he calls it, but it’s actually a reciprocating saw. It’s kind of like how everyone calls tissues, Kleenex.) And there it is – the shower space with nothing but the studs. OK – if you’ve made it this far, you can give yourself one very, very small pat on the back. Although not a very fun step, it is a necessary evil when you tile a shower.
Sheetrock a Shower
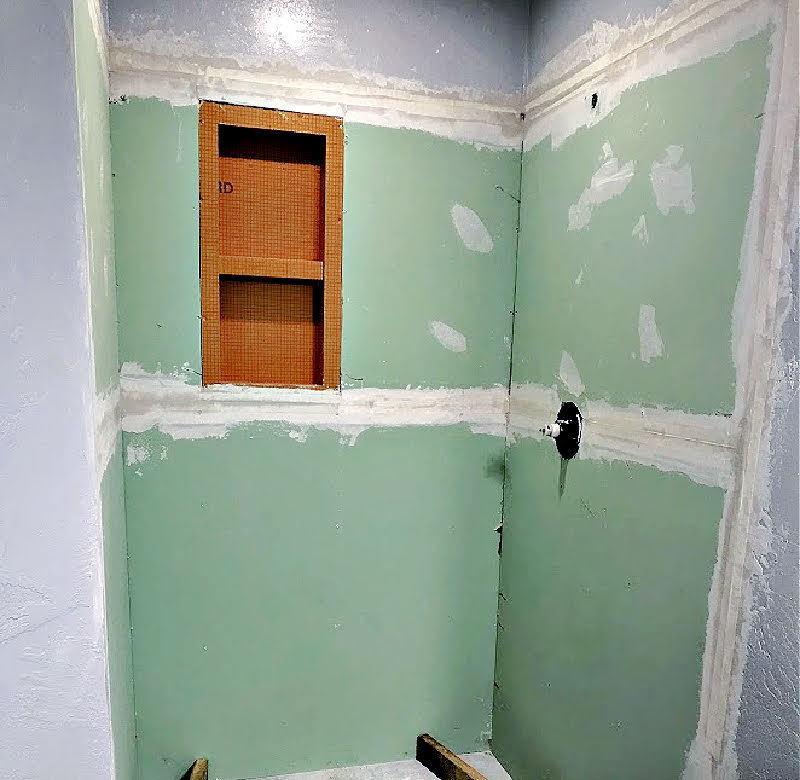
Next is adding sheetrock so that you have walls to tile a shower. We used a special sheetrock which resists mold and moisture. Mike measured the 3 walls where the insert had been removed and cut 6 new pieces. Mike had to cut multiple pieces because sheetrock is only 4 feet wide and the back shower wall was wider than that. Even though he could have cut the 2 end pieces in 1 sheet each, he still chose to cut each in 2 pieces. It certainly makes it easier when trying to maneuver and also when trying to cut out holes for the shower head and handle.
To attach the sheet rock to the wall, you must nail the sheetrock to the studs using drywall nails. If you’ve never seen these, they’re cute little nails with a small divot in the nail head. Once the sheetrock was up, it was my turn to “do my thing”. I put some drywall mud (or some people call it drywall compound) in a stainless steel mud pan. Then with a drywall putty knife, I applied a thin layer of mud where the seams came together. I also put enough mud on the wall around the seams so that I could place a piece of drywall tape on the seams. (I have no idea why I like doing this part so much.)
Once the drywall tape was placed on the seam, I used the same putty knife to gently run it across the seam and let the compound ooze out from underneath the tape. You actually only want a small amount of the compound to be underneath the tape. Then, I used the same drywall compound to place a thin layer on TOP of the drywall tape. I repeated this process on the sheetrock seams.
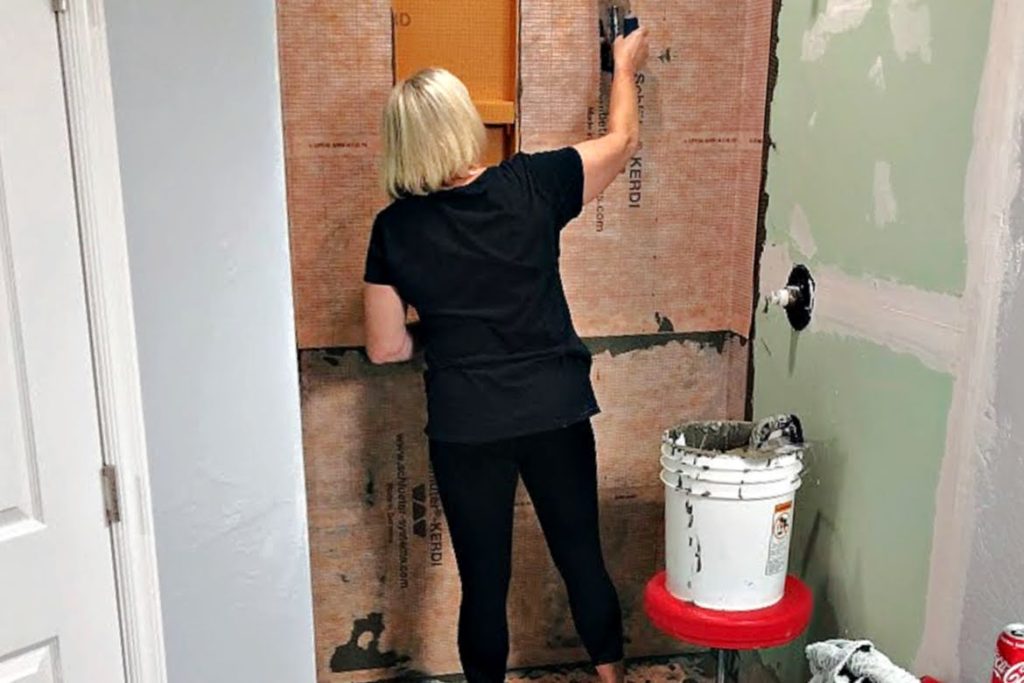
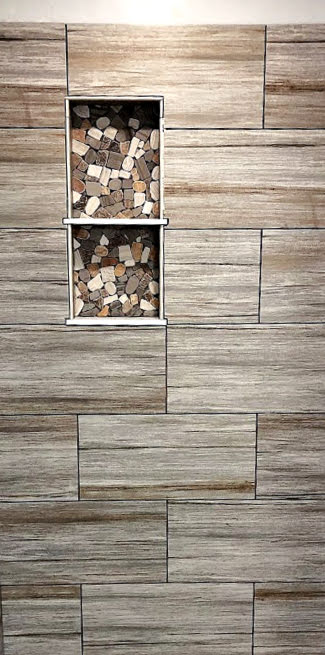
You will also notice an orange unit that looks like a shelf on the back shower wall. Mike will ONLY use a product called “Kerdi” on all shower installations. Kerdi is a polyethylene waterproof membrane that you use under tile. Kerdi has all kinds of products that are all made out of this special material. Since my sister wanted a niche in her shower, she purchased one of the Kerdi niches.
I’m going to tell you that all this “Kerdi” stuff is not cheap. But, it is a wonderful product. Mike and I are not endorsed by Schluter (who makes Kerdi) in any way. We just both REALLY love this product. Mike estimates that he has tiled approximately 60 showers in his career (the guy is kind of old – lol!). Not once has he ever had any issues with a shower leaking when using Kerdi.
So, after we had the sheetrock up, Mike did cut a new hole in it to accommodate the Kerdi niche. The easiest way to put in the niche is to place it in between 2 wall studs. Once the hole was cut, he placed the niche in the hole and secured it with the drywall screws.
Building the Shower Curb
Now, you may be itching to start tiling, but you are still several steps away from being able to tile a shower. I know, it’s a lot of work just prepping the area. But, trust me, if you do your prep right you have a much better chance of having an amazing shower. So, let’s build the shower curb.
There is actually a Kerdi shower curb and floor that can be purchased. But, you know what that means – yep, more money. Mike and I were doing this work in the most cost effective way possible which my sister appreciated because she was paying for the materials. It’s not difficult to build the curb and floor but it also adds a couple of days to the shower project because you have to wait for each piece to dry before moving on.
We built the curb out of concrete just like we did when building our concrete step for our screened in porch. So, similar to that process Mike started out building a form out of two 2″ x 6″ boards. He cut the boards to the length of the shower and placed the boards 4 inches apart. To make sure the boards didn’t move while he poured in the concrete, he cut some 2″ x 4″‘s for braces and propped them against the back shower walls and a cabinet. This made the forms more secure.
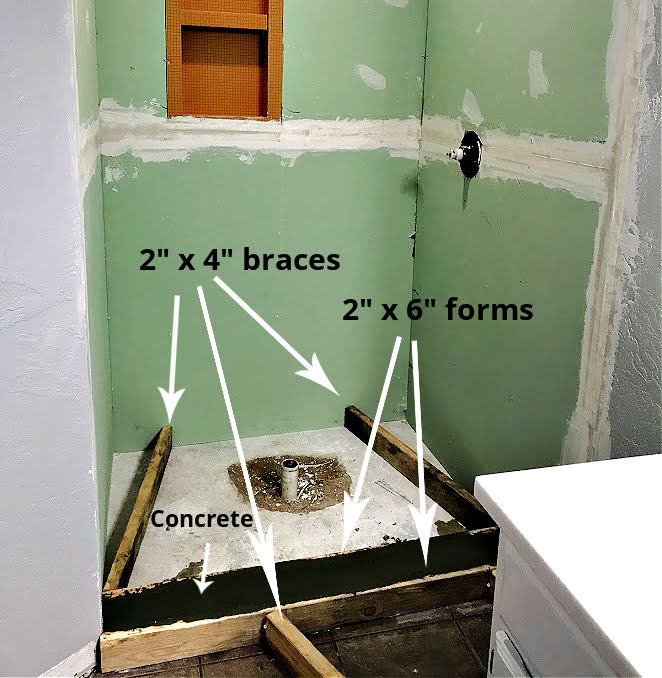
When mixing the concrete, we used between 1 and 2 bags of concrete. Mike filled the forms with concrete to the very top of the forms. You will also want to make sure that you use your trowel to tamp down the concrete. This will ensure that your concrete is solid and that “honeycombs” don’t form. (If you’re not sure what that is, just google it!) He then used a trowel to smooth off the top.
So, now you have a curb that is approximately 4” wide by 6” tall. Once this step is complete, you’re done for the day. This needs to dry overnight before proceeding.
Building the Shower Floor
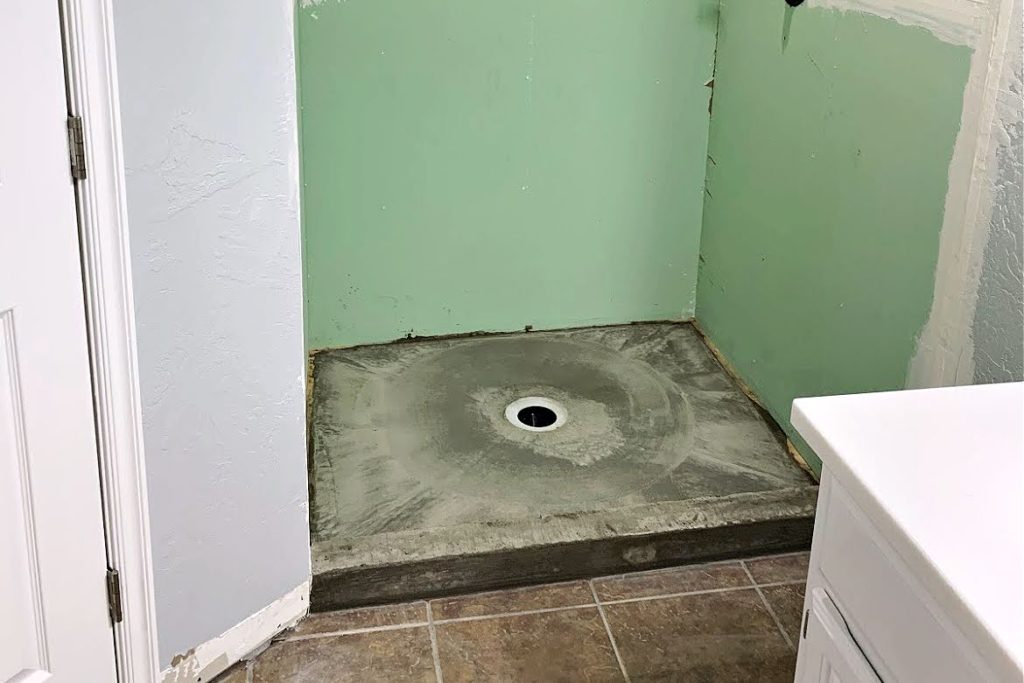
The following day, we removed the braces and the forms by simply pulling them off. Although my sister’s space had a concrete bottom, we couldn’t use this for our shower floor. If you really want your shower to drain properly, the floor should slope to the middle of the shower where the drain is located.
So, we were going to pour more concrete on top of the existing concrete. But, our concrete pour would contain a slope of approximately 1.5”. My sister’s space already had a drain pipe and she purchased a shower drain for it. For this shower, we used a Kerdi drain. (I know, shocking, right?)
My hubby placed the Kerdi drain on top of the drain pipe just to see the height of the drain placement. The drain pipe ended up being a little too tall. So, Mike cut a little off the drain pipe with a grinder. (He hasn’t actually let me use the grinder yet. He says it’s for my own protection – LOL! But, since I’m getting so good with power tools, I am now using various types of saws.)
Once he had the correct height and the drain was in place, it was concrete mixing time again. As always, we mixed the concrete by using two bags at a time. Because we needed the concrete to slope, Mike marked a 2 inch line all the way around the shower floor. So, the floor would be 2 inches thick by the shower walls and only ½” thick by the drain. (This creates the 1.5” slope).
So Mike first poured the concrete along the back wall, then around the side walls and front. As he poured in additional concrete, he would smooth it (moving towards the center) with his concrete trowel so that the bottom was only ½” thick. Around the drain area, he made sure to pack the concrete in good and tight. It’s also important to note that you need to leave the Kerdi drain exposed. (Do NOT concrete over the drain or that would be very bad for you – major sad face.)
After the concrete floor is poured, you’re still not quite finished for the day. (Well, I was finished for the day. This is the really boring part where you just sit around and wait for concrete to dry. Trust me – this is not very exciting.) After about an hour, you have to trowel the surface again to try to get it as smooth as possible. You actually have to do this 2-3 more times. But, once you’re satisfied with the smoothness, you’re finished for the day. Finally!!!! And, you’re getting closer to your goal of being able to tile a shower.
Applying Kerdi to Floor and Walls
In order to ensure that the shower was waterproof, we put the Kerdi membrane on the floor and walls. The floor was first. When measuring and cutting the Kerdi, we added 6 inches all the way around to the floor measurements. Mike actually had to cut the Kerdi in 2 pieces for the floor but made sure that he had several inches of overlap for piecing it together.
Next, we mixed tile mortar. There are different types of tile mortar that you can use. You have to make sure that you get the correct one for the type of tile that you plan to use. We used a tile mortar appropriate for ceramic tile and stone. We also selected a tile mortar that was a polymer enriched thin set.
After it was mixed, it was my turn to apply the mortar to the floor. (Again, I have no idea why I like this part, but I actually get irritated if Mike tries to do it. LOL!) I applied it to the bottom of the shower floor and up the walls a few inches using a small v-notched trowel. Next, I placed the Kerdi on top of the mortar and used the flat side of the trowel to smooth it and get all of the air bubbles out of it. A little trick that Mike taught me is to leave the Kerdi over the drain. Then, when you’re tiling, you don’t get any debris or tile mortar in the drain.
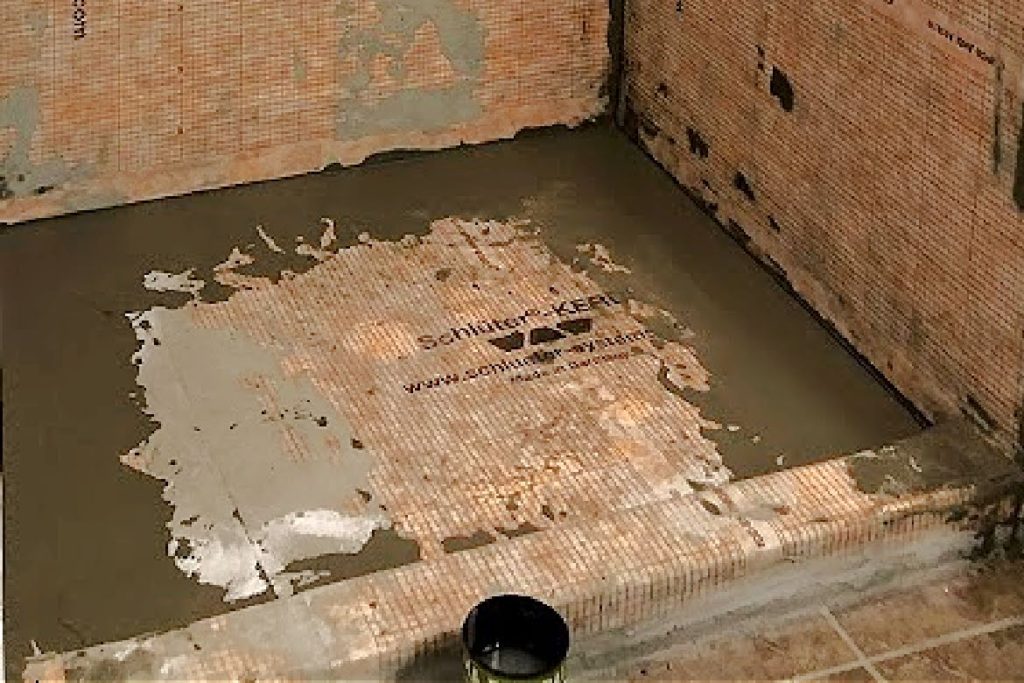
When purchasing the Kerdi drain, it had the shower corner pieces with it. So after the Kerdi floor was down, I mortared in the corner pieces. Then it was time to let the floor dry overnight. (NOTE: The tile mortar that you use to install the Kerdi is the same mortar you will use to tile your shower.)
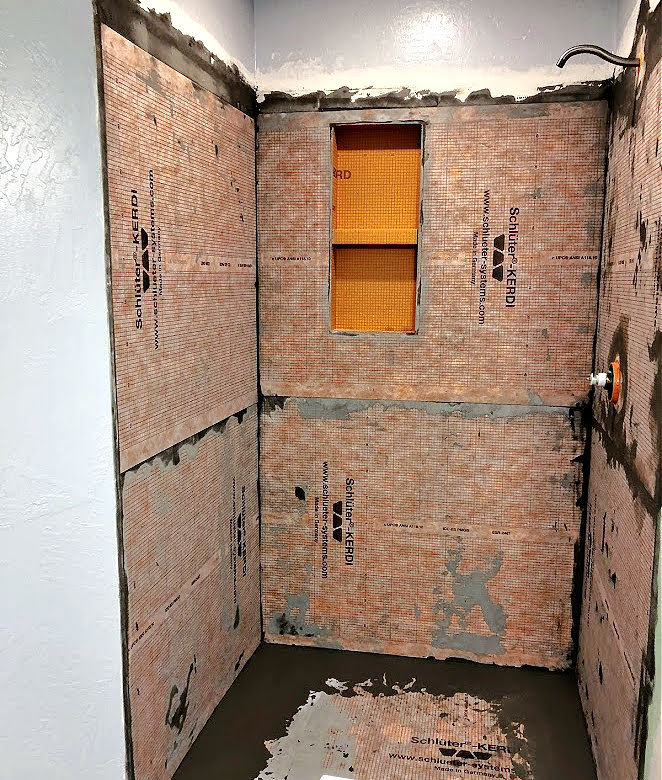
The following day, it was time to put Kerdi on the shower walls. I followed the same process of putting thin set on the walls and applying the Kerdi on top of it. It’s important to overlap each piece of the membrane so that you reduce the possibility of water being able to penetrate it. We applied Kerdi to the back wall first – bottom then top. We did this so that the bottom piece of Kerdi had time to dry while we finished the rest. If we weren’t too tired after applying the Kerdi, we were going to start tiling the back wall on the same day.
Once the walls are complete, you’re ready to tile! Woo-hoo! Finally!!
Tiling the Back Shower Wall
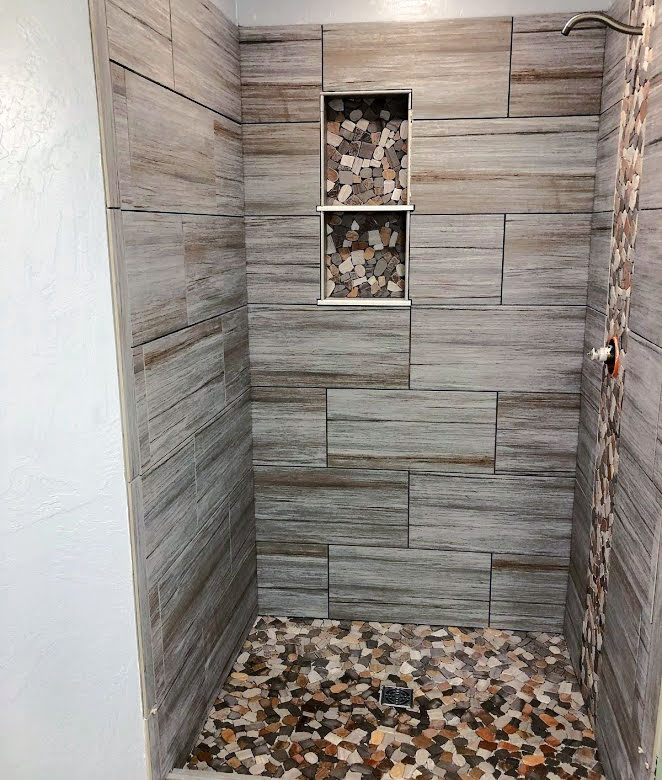
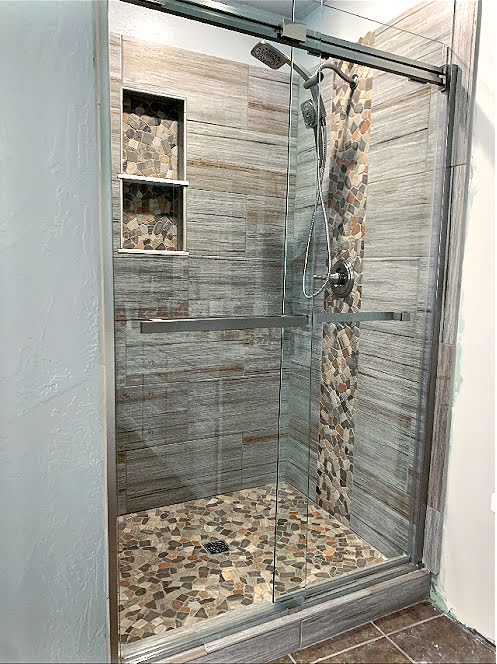
Mike always starts with the back shower wall first. Since our niche was on the back wall, we decided to start here. We were going to be using tile that was 12” x 24”. In addition, we had found a coordinating tumbled pebble tile that we planned to use for the floor and as an accent in the niche. We also decided to add a waterfall accent using the same pebble tile on the shower wall that contained the shower head. So, we had our work cut out for us.
Typically, when laying tile, you apply the thin set directly to the back of the tile and trowel it using the large notch of the trowel. But, the pebble stone is too flimsy to do this so you must apply thin set directly on the shower wall where you want the tile.
After Mike measured the back of the niche for tile and cut it with the tile saw, he handed to me to set. I applied thin set directly to the back of the niche and used a small v-notched trowel in the application. If you use a large notched trowel on this part, you’ll be very sorry. The large notches will cause too much thin set to ooze out of the part that you eventually want to grout. Save the large notched trowel for the larger wall tile.
We then let the back niche pieces dry while we moved on to the shower wall. You will need to decide what type of pattern you want to use when you lay your tile. We decided on a brick laid pattern that repeated every 2 rows. Mike sketched out our pattern on a piece of paper until we both agreed on a final design.
We placed a piece of scrap ½” sheetrock on the floor and bumped it up next to the wall we were getting ready to tile. This served as our spacer for laying the first row of tile. Since you tile the floor last, you have to allow room for the floor tile to fit underneath the wall tile plus leave enough room for grout. A piece of sheetrock is the perfect height to allow for this.
Then it was just a process of Mike measuring and cutting each row of tile. As he cut the tile, I “back buttered” it (that’s how the tile professionals talk – lol!) using a large notched trowel and attached it to the wall. As I laid each piece, I placed tile spacers in between each piece. We used 1/8” tile spacers but that is really up to you and how big you like your grout lines.
Also, after every 1-2 rows, we put a level on the tile to ensure that it was running straight. If you don’t do this, you might be sorry when you get to the top. Even if you are slightly off, you can easily correct it as you go by getting creative with your tile spacers. Sometimes all you need to do is add an extra spacer on one end or turn your tile spacer sideways. (little tricks of the trade that Mike taught me)
You can finally give yourself a big pat on the back because you have learned to tile a shower!!
Tiling the Side Shower Walls and Floor
After we had tiled all the way up the back wall, we started on the side wall without the shower head. This was the easiest shower wall since it was short and didn’t have any accent tile going on it. We started at the bottom once again using our sheetrock spacer for the first row. Then, we tiled it all the way to the top.
Next, we went back to the shower niche and Mike cut the pieces for the inside walls of the niche. Getting the tile to stick here is sometimes a little tricky since the top pieces are hanging upside down and have a tendency to want to fall off. I held these pieces for several minutes, then applied some tape to help hold them until they dried.
The final shower wall was the one with our decorative feature – the waterfall. We decided to make our accent the width of the pebble tile which was 12 inches. But, we applied all of the other wall tile first before the accent pieces. Mike drew lines where the accent tile would be placed so that he could measure appropriately for the other wall tile.
Mike always says that construction is basically doing one thing and repeating it a thousand times (Ha! Ha!). Well, this is very true when it comes to laying tile. He just kept cutting and I kept buttering the tile and laying it. The trickiest part of laying the tile in this particular shower was the pebble tile. Since it has more play in it, you have to be really careful that you get it spaced correctly.
When it came time to lay the waterfall feature, Mike did all his measuring and cutting on all pieces before I laid any of them. There were some tricky cuts on these pieces since he had to go around the shower head and handle. When I laid these, it was just like any other piece of tile. I used my tile spacers all around to allow for grout lines.
After all the walls were tiled, we went back to the niche to apply the final decorative pieces that went on around the corners to outline it. Only one more thing to tile – the floor. We are close to having a complete tiled shower.
Just like Mike did with the waterfall feature, he laid out all of the pebble floor tile first. He measured and cut everything including the opening for the drain. Before I started laying the floor tile, we cut out the Kerdi around the drain and Mike placed the drain grate on top of the drain. When I laid the floor tile, I was sure to place the edges of the pebble tile under the wall tile.
Grout and Finishing Touches
After the tile on the shower was completed, we had to let it dry overnight before grouting. Once again, when it comes to grouting, Mike and I each have our job preferences. And strangely enough, we like the exact opposite jobs. He prefers applying the grout whereas I prefer the grout clean up.
But before we could start on grouting, there is some prep work. First, you must remove the tile spacers. You can pull these out by hand but sometimes they’re stuck to the thin set and difficult to pull out. So, I like to use needle nose pliers to pull them out.
Next, you have to inspect all the places where grout will be applied and make sure that there’s no thin set on the walls or in the grout spaces. If there is, you must remove the thin set. On the walls, it comes off easily with a sponge dipped in water. If there is thin set in the grout lines, use a grout saw for removal. I was the clean up person while Mike was mixing up the grout.
We used unsanded grout because the grout gap was less than 1/4″. If you have a 1/4″ grout line or larger, you will want to use grout with more substance to it. In that case, you can use sanded grout. When the grout was ready, Mike applied it to the walls. You have to be sure and really push the grout in there with your grout trowel. Mike likes to use a hard rubber sponge float for applying the grout.
After my hubby had one wall grouted, I did my “clean up” job. I got a large bucket full of water with 3 large sponges. After the grout starts to dry, a haze forms over the tile. Once the haze forms, then you know it’s time to wipe it off. I used the large sponges to gently wipe over the wall diagonally picking up the “extra” grout. If you press too hard or if you don’t go diagonally, you risk pulling the grout out of the lines. You should be continually rinsing off your sponges in the bucket of water. After the first clean up pass is complete, you will wait for the grout to haze over again. Then, you guessed it, repeat the process. You will perform this clean up wiping process 3-4 times on a wall.
After Mike grouted all walls and I performed the clean up, it was time to grout the floor. Of course, you use the exact same process as you did on the walls. Then, you’re done for the day and you must wait for the grout to dry. (I know, there’s a lot of waiting on things to dry when tiling a shower.)
The following day, Mike installed shower doors that my sister purchased and added a new shower head and handle. It really is a lot of work to tile a shower but look at the stunning results!
And you know how much I love before and after pictures, so here we go!
2 comments
Most expensive part had to be the glass doors and hardware. It’s like gold.
Big change. Looks great
Fantastic upgrade! ❤️ Love your choice of materials, looks great!