
")
If you’re like us, we LOVE exploring kitchen ideas since the kitchen is the heart of the home. It’s cold right now in Oklahoma, so progress on our lake house renovation is slow. (Burskies – that’s my sister’s way of saying it’s cold out. I’m pretty sure she made up that word.) So, we’re currently spending time in the design phase of our soon to be “remodeled” kitchen. While looking for kitchen ideas, we reflected back to the decisions we made when building the kitchen in our Texas home.
We spent so much time planning , designing, and building our Texas kitchen that we decided to use the best features and do something similar in the Oklahoma lake house kitchen. I mean, why reinvent the wheel, right? But, are there some things we would change about the Texas kitchen? (Of course – Is there a moustache in Mexico?)
No matter how perfect your plans are, I think you will always find something that you wish you had done differently. Our Texas kitchen is no exception. At the end of this post, I’ll share the lessons we learned when building our kitchen. I’ll also share what changes we plan to make in our lake house kitchen as we explore new kitchen ideas and trends.
Many of the selections in our Texas kitchen were upgrades and of a quality that you would see in an upper end kitchen. But, based on the size and price point of our home, it’s what buyer’s expect. Since we knew that we wouldn’t be in our TX home forever, we really gave much thought to resale value when making decisions.
Let’s start out with the good stuff. Here are some finished pics of our Texas kitchen.
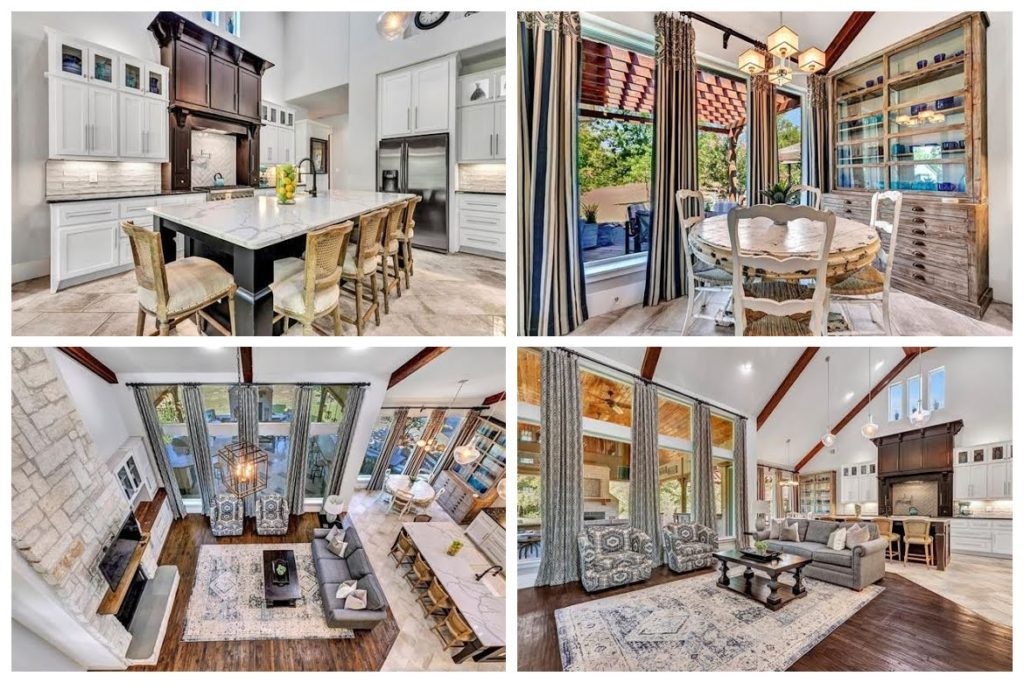
Now, let’s see the road we took to get there!!
The Kitchen Cabinets
If you’re building a home or remodeling your current kitchen, one of the most important decisions you’ll make is your cabinets.
There’s actually more to consider when deciding on cabinets than you think. What type of wood? Do you plan to paint or stain? Style? Custom vs. Manufactured? Type of Range Hood? Cabinet hardware and hinges? Lights – over cabinets, in cabinets, under cabinets? What about extra features?
Custom vs. Manufactured
We chose to have our cabinets custom built by a cabinet maker in his shop. This is probably the most expensive option for kitchen cabinets.
You can have custom cabinets either built on-site or built in the cabinet maker’s workshop. There are a few advantages to shop-built custom cabinets. First, you don’t have the mess in your home for weeks. The cabinet maker takes his measurements then goes back to his shop for building. When he’s done, he comes back to install them which can typically be done in a day.
Shop-built custom cabinets are built with solid backs. This means there is no sheetrock at the back of the cabinets which makes for a nicer finish inside. It also helps to prevent bugs from being able to get inside.
And most importantly, shop-built custom cabinets have adjustable shelves. They typically have holes drilled in the sides so that you can place the shelves at whatever height you choose.
Type of Wood and Style
We knew that we were going to paint our kitchen cabinets. So, when selecting the wood, we wanted a product that had little grain. We chose hard maple. It is light, dense, close grained, and fine textured.
So, this means that it paints nicely. It is a wood that is also somewhat cost efficient. (I can’t believe I’m using wood and cost-efficient in the same sentence. Have you seen the price of wood since COVID? Eeks!! It’s gone up double and triple from what it was a year ago.)
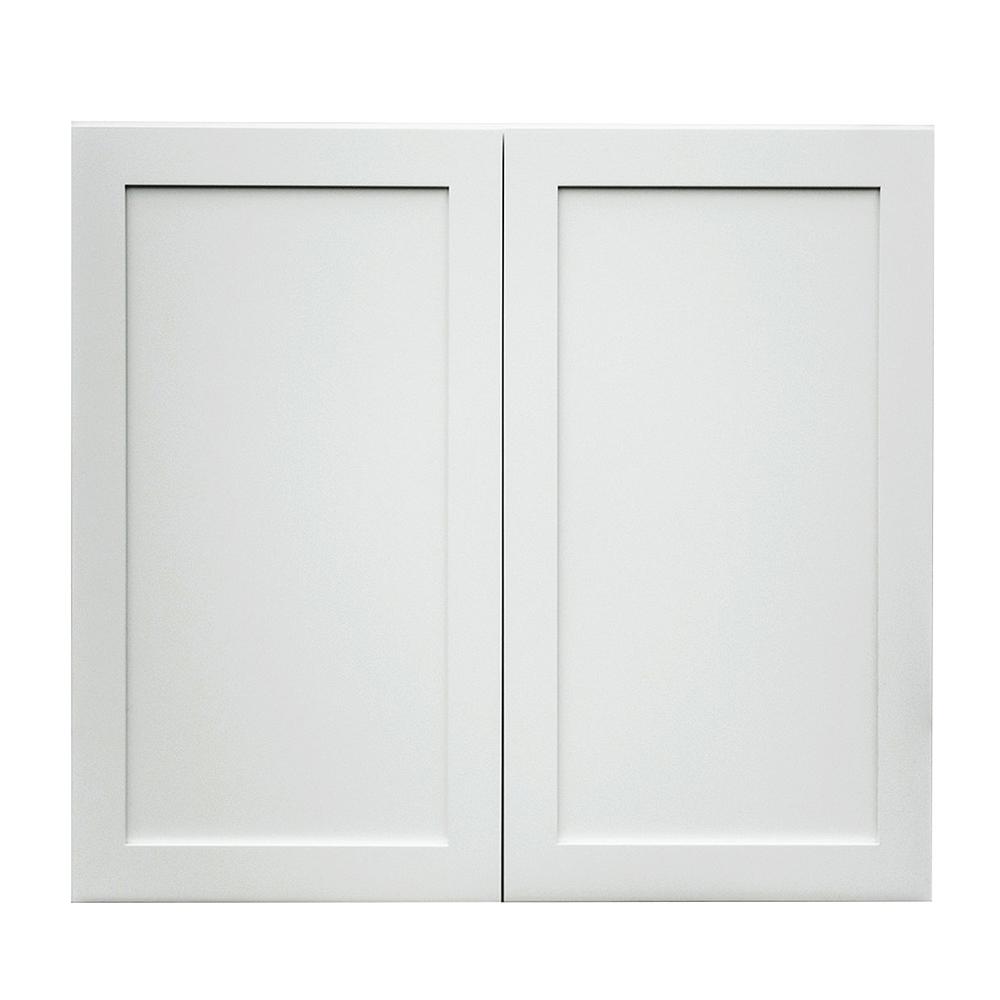
Another decision to make in regards to cabinets is the door style. Mike and I really gravitate towards items with a transitional style. We knew that we wanted our cabinet doors to reflect this style. After living in multiple houses with some type of traditional raised panel cabinet doors, we were ready for a change. We ultimately selected classic shaker style cabinet doors for our home.
Cabinet Hardware and Hinges
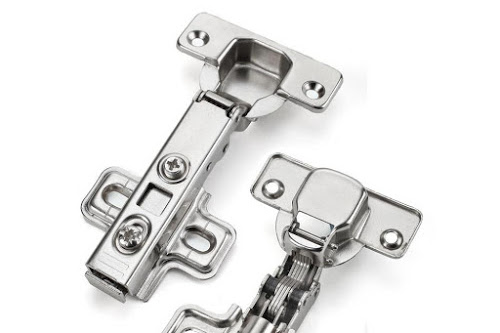
The hardware and hinges can really add up if you go all out. We wanted hinges that were high quality but also invisible from the outside. So, we selected a European hinge which is completely concealed from the outside. It also gives your kitchen a more modern feel.
A variable that significantly increased the cost of our hinges was the “soft-close” feature that we selected. A soft-close hinge is a specialty hinge that has a damper built into it that enables the door to be softly closed.
In our cabinet design, we planned to have several drawers that pulled out. In order to make getting in and out of drawers easier, we selected full-extension drawer slides. (Again, another feature that adds to your hardware cost.)
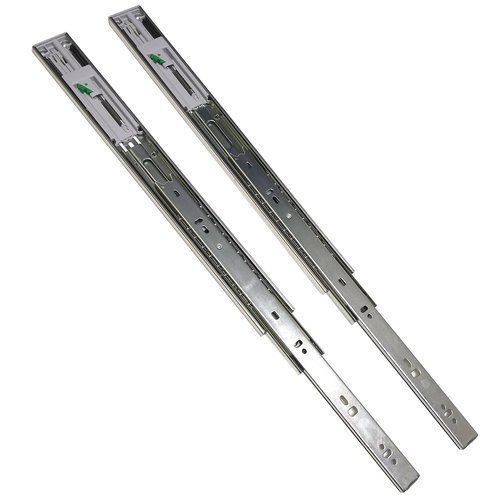
But, these things make such a difference! It allows the drawer to open to the full length of the slide. It provides greater access to get those things at the far end of the drawer. (And I’m always in favor of making things easier!)
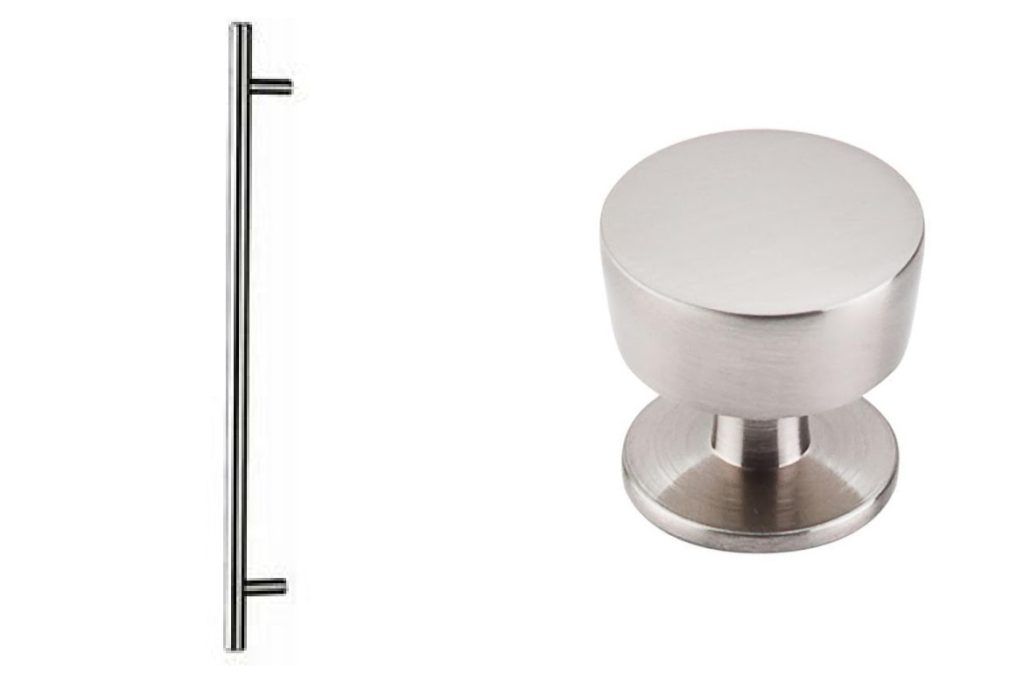
For the hardware on the outside of the cabinet doors and drawers, we chose both bar pulls and knobs. Again, we chose items that were simple and sleek.
For the bar pulls, our selection was from the manufacturer Top Knobs in the Hopewell collection. We chose the brushed satin nickel finish. We also selected a variety of lengths depending on the width and height of the door it was going on.
For the smaller cabinet doors and drawers, we chose a 1 and 3/16” mushroom cabinet knob also from the manufacturer Top Knobs. This was from the Essex collection and again in the brushed satin nickel finish.
Range Hood
Since our cabinets were custom made, we had the luxury of having our cabinet maker craft a beautiful mantel range hood. He had books full of designs. All we had to do was to select one.
Cabinet Extras
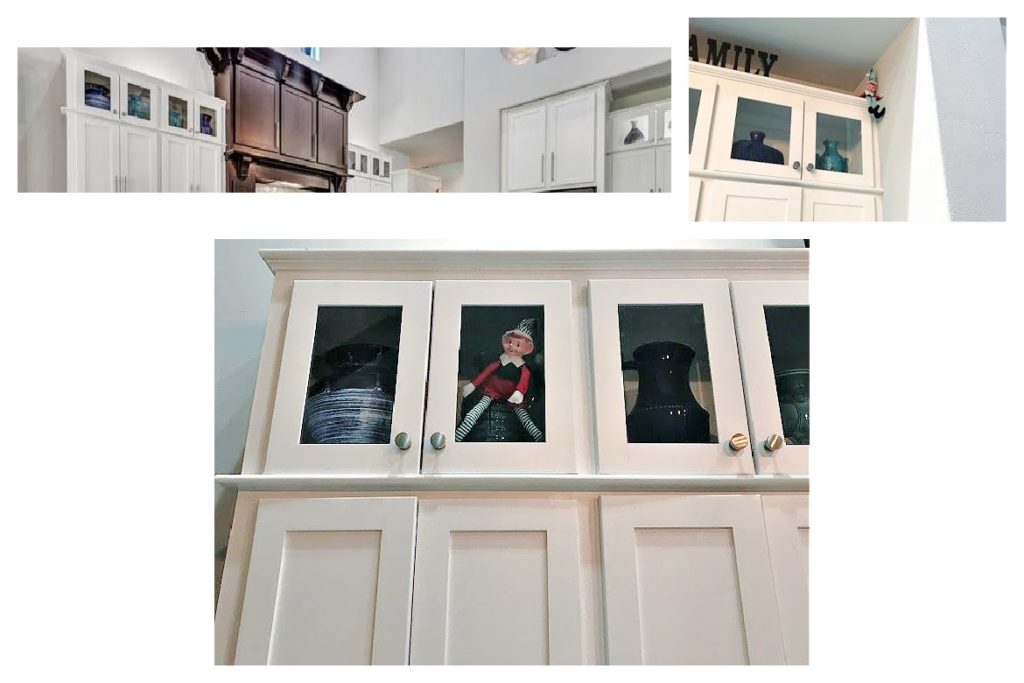
For an extra design element, we decided to add artisan lighted glass front cabinets to the top of our kitchen cabinets. There are many popular designs out there today with open shelving or glass front kitchen cabinets. While we thought these were beautiful, we were concerned with always having to keep them looking neat and tidy.
So, the upper lighted artisan cabinets were a great middle ground. We could place some type of decorative item in them and leave them. But, they still had the glass feature that we wanted.
Now that I think about it, I’m wondering if Mike added those extra cabinets so he’d have a place to hide the “Elf on the Shelf” at Christmas time. I can’t tell you how many times I’ve found the Elf in those cabinets – LOL! Even though all of our children are grown and out of the house, he still hides that thing for me to find. (Seriously, how old are you Mike?)
We also added a cabinet that housed a pull-out double trashcan. I can’t tell you how much I love this!!

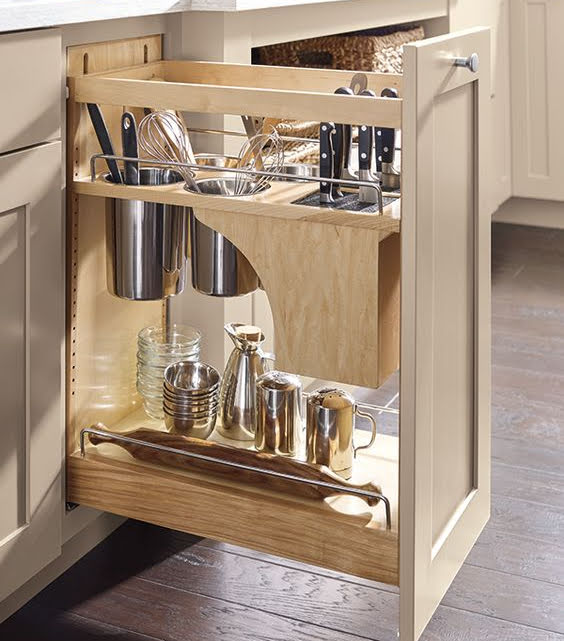
On one of the lower cabinets closest to the stove, we included a pull-out cutlery and utensil drawer. This thing was AMAZING!
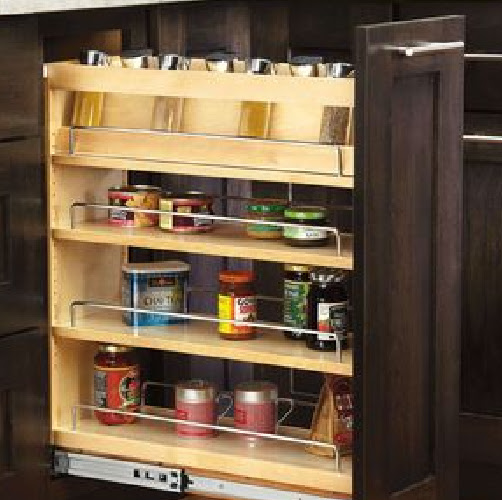
We included 2 pull-out spice drawers to the right and left of the stove.
Because we wanted our kitchen to have as much light as possible, we added both under cabinet lighting and over cabinet lighting.
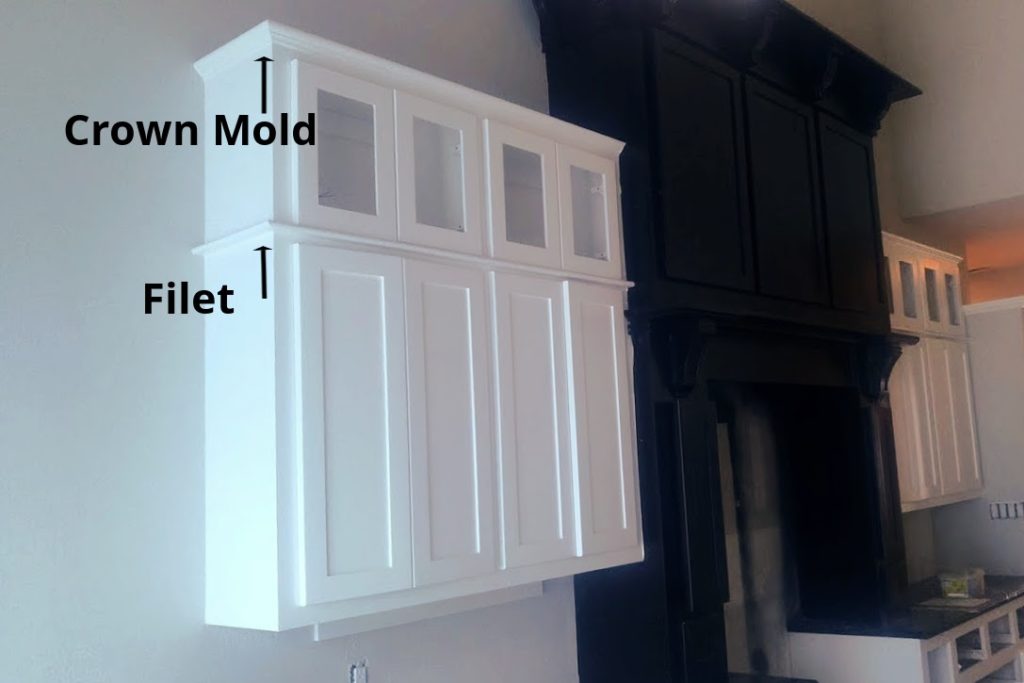
After the cabinets were installed, my hubby decided to add 2 items to complete our custom kitchen look. (‘cause that’s just how he rolls) In between the lighted artisan cabinets and the bottom cabinet, he added a piece of trim called a “filet”.
We purchased 1”x 4” primed spruce for the filets which he ripped in half and routed and sanded the edges for a finished piece. He attached these with glue and a brad nail gun.
He also added crown molding to the top of the cabinets. It’s all those little extra details that can set your kitchen apart and give it a really custom look.
Countertops
Our kitchen island was huge and we wanted something that was eye-catching but didn’t overpower all of the other great elements in the room. We finally decided on Quartzite. (This ended up being a very expensive decision, especially since our island was 4’ x 9’.) We also decided to go with a thicker slab than a builder’s normal grade of 2 cm. Our Quartzite was 3 cm and the color was Calacatta Lux.
For the remaining countertops, we chose granite in the color Volga blue. (Don’t let the blue in the name fool you. It didn’t look blue at all. It was a stunning piece of granite.) Again, we upgraded to a 3 cm granite slab. And of course, this also ended up being a very expensive decision.
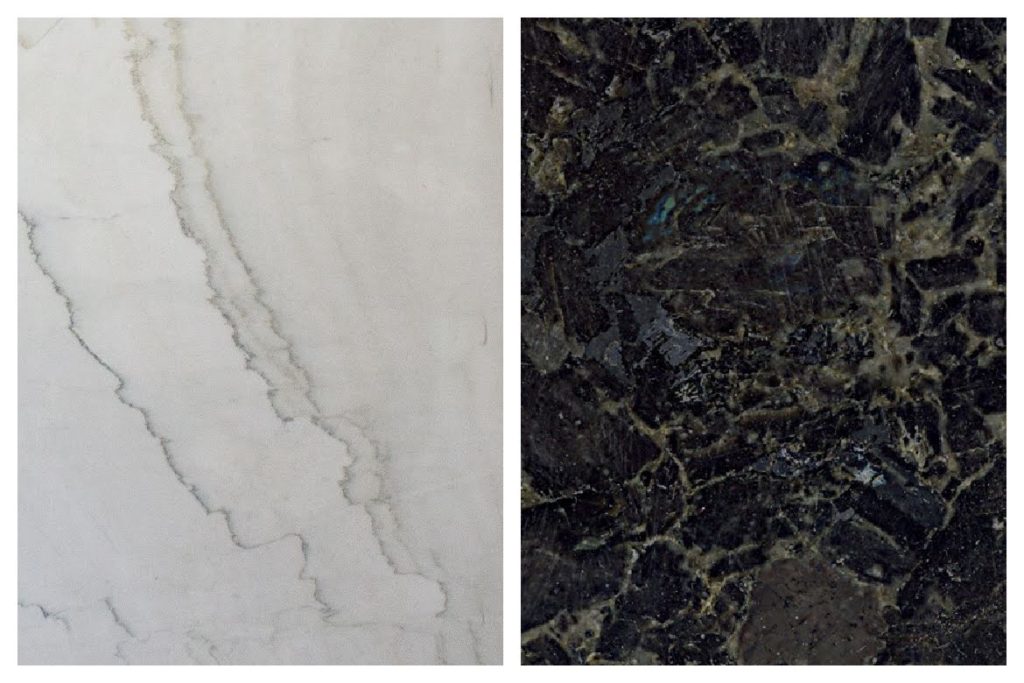
But it was great fun going to the Allied Stone showroom in Dallas, Tx and selecting our own quartzite and granite slabs!
Lights
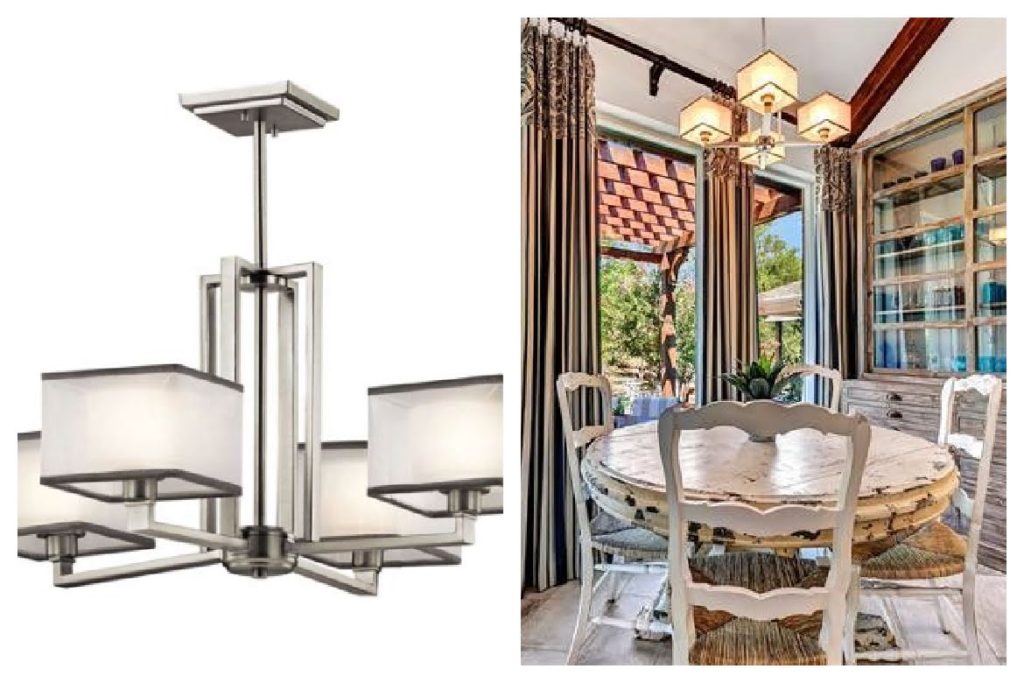
We chose this light fixture from Kichler in the Kailey collection. We selected the brushed nickel finish and placed it over the breakfast table.
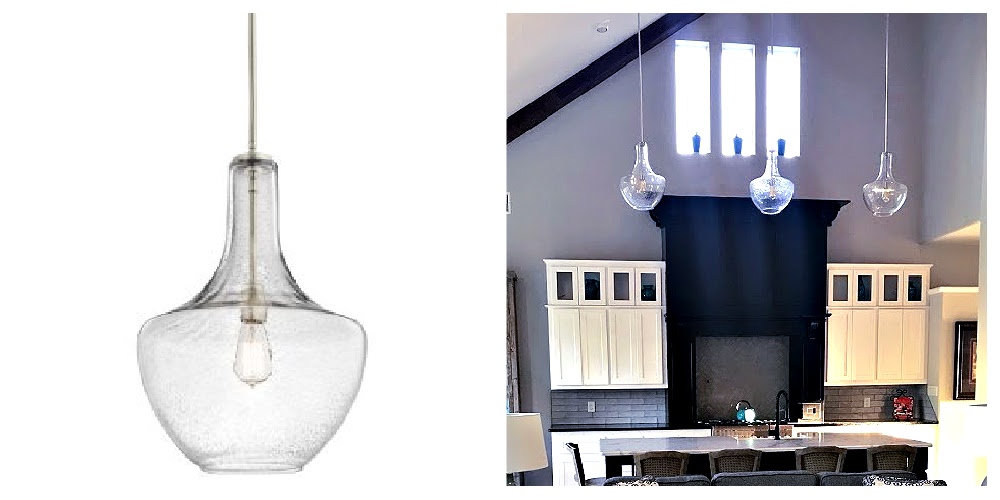
For the island lighting, we had a bit of a challenge because our walls started at 10 feet tall and slanted to 19 feet tall. We wanted some type of pendent lights but needed to ensure that we could hang them at varied heights due to the ceiling slope. We chose these pendants by Kichler from the Everly collection.
Flooring and Backsplash
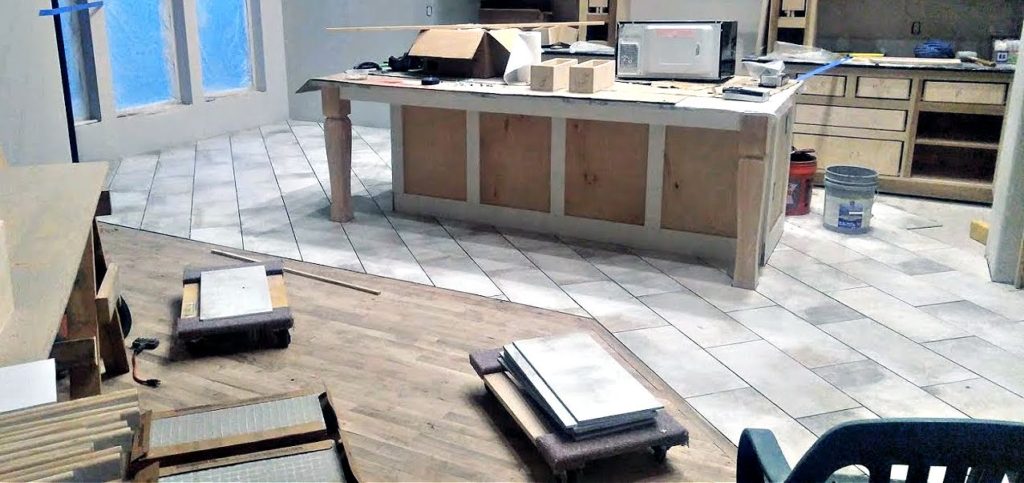
We really went back and forth several times on the floor decision. Since our kitchen was open to our family room, we contemplated putting a wood floor in all the downstairs which included the kitchen and family room.
But, in the end we were concerned about placing such an expensive wood floor in a kitchen. So, we opted for tile instead. We found this great tile that was 12” x 24”at a surplus store in the Dallas area. Of course, my hubby doesn’t like to do anything the easy way. He insisted that we lay the tile at an angle. (He loves angles! You’ll see this as a common theme in some of the other tile that we laid in our house.)
I’m not going to tell him, but he was right. It was amazing when we were finished. But, we had to carry this angle all the way into the laundry room, pantry, and hallway. Let’s just say, it was A LOT of tile. My knees were very thankful when we completed that tile job!
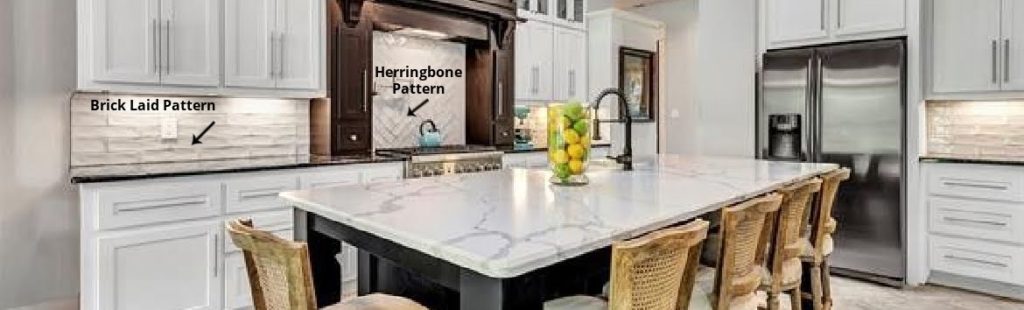
For the backsplash, we selected 3” x 12” subway tile. It was a simple light gray tile. Behind the granite countertops, Mike laid it in a normal brick-laid pattern. However, because of his love of angles, he wanted to do something different behind the stove. So, he chose to lay it in a herringbone pattern. (I told ‘ya, the guy loves angles!!)
Appliances
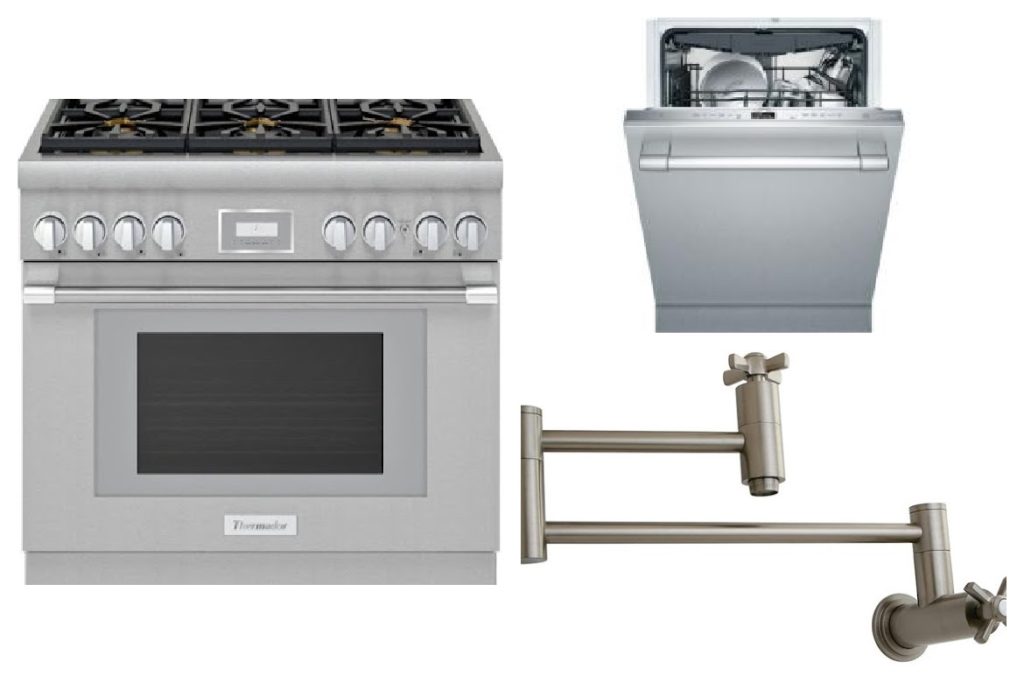
We chose a 5.0 cubic foot professional gas range by Thermador. It had 6 large burners on top and the oven was exceptionally large.
When we purchased the range, Thermador had a promotion which included a “free” dishwasher. (That still makes me laugh! For the price of the range, I hardly think we got a “free” dishwasher. Well, we needed a dishwasher anyway. Ha! Ha!) So, our dishwasher was a 24” professional handle fully flush built-in dishwasher. And, I have to admit that the “free” dishwasher was quite spectacular.
We didn’t purchase a new refrigerator since we already had one which would work for the space that we had.
Although not really an appliance, we also elected to purchase a pot-filler. They have such a cool industrial look and we thought that it would look great in our kitchen.
Kitchen Extras
Since my hubby and 2 helpers framed our entire Texas house, we had the luxury of “adding a little extra” here and there as he was building. All of the doors downstairs are 8 ft. tall instead of the standard 6’8” height.
There are 3 oversized kitchen windows by the breakfast table which are 3’ x 7’ tall. Then, Susie Seamstress (otherwise known as me) went to work and made custom drapery panels using 2 different fabrics. I like to hang my drapery panels almost to the ceiling. This makes the windows look bigger and the room feel larger.
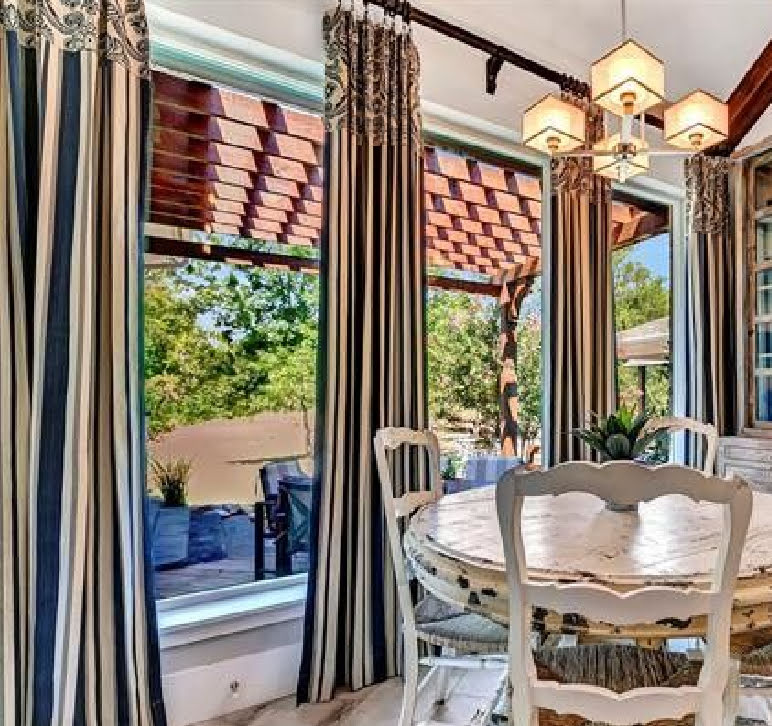
I’m sure I’ll end up doing a future tutorial on making drapery panels since we have no draperies in the Oklahoma lake house. But I will let you in on a little money saving trick. Instead of using expensive curtain rods, Mike and I used inexpensive electric conduit which we spray painted black and then added finials on the ends.
As I mentioned, the walls in the kitchen start out as 10 ft. tall then slant up into the family room with a ceiling height of 19 ft. This makes for some very tall walls. To add a design element to these walls, Mike framed a niche which was approximately 6’ x 6’ over the cabinets on one kitchen wall.
You’ll see these niches in a few places throughout our home. We ended up purchasing grey and white flooring with a distressed look that we added to all the niches. In the kitchen niche, we went on an exhaustive search to find different styles of clocks that we arranged in a “clock collage”.
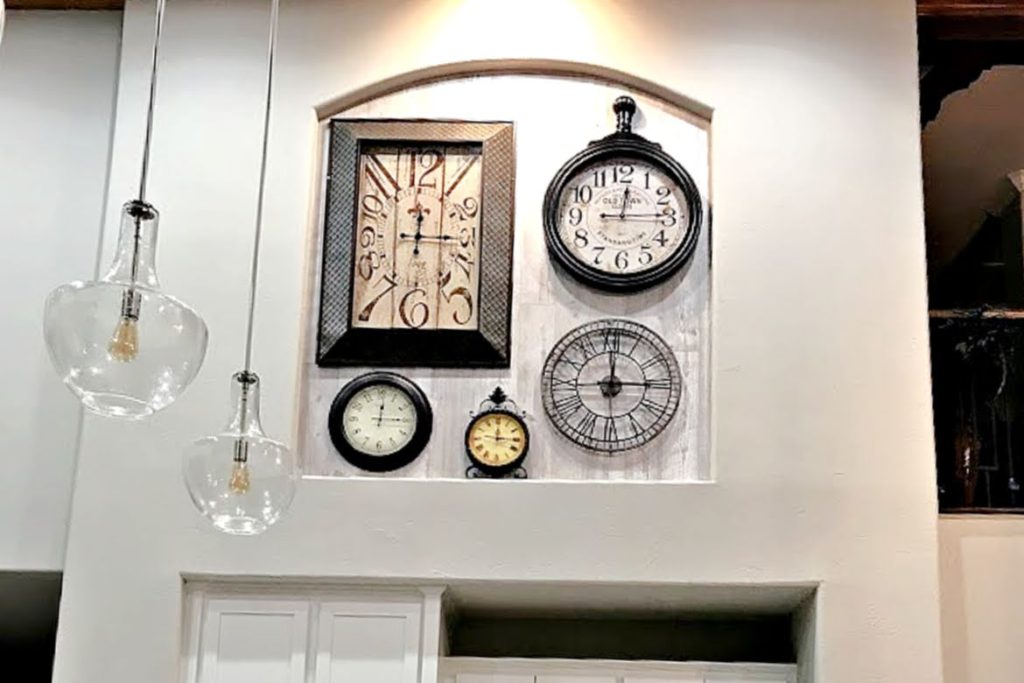
Obviously, we did not want all of these clocks running, so we removed the batteries. All the clock hands are set at 12:15. (So, twice a day, they tell the correct time – LOL!)
Paint Colors
We used neutral wall and trim colors throughout our home. In the kitchen the walls are Repose Gray (SW 7015) by Sherwin Williams in a flat finish. The ceiling is Eider White (SW 7014) by Sherwin Williams also in a flat finish.
The majority of the kitchen cabinets are Pure White (SW 7005) by Sherwin Williams in a Satin finish. The mantel hood range and the island are Tricorn Black (SW 6258) by Sherwin Williams also in a Satin finish.
Our Inspiration Kitchen
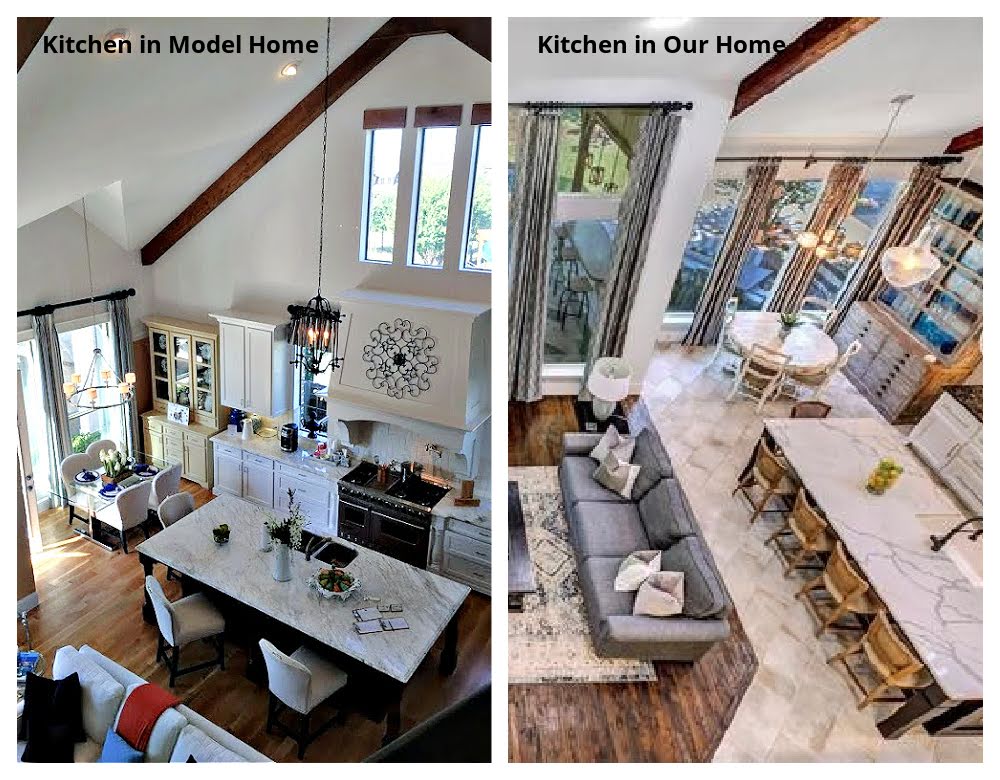
When you’re looking to build or remodel a kitchen, it’s always a good idea to hit the pavement and look at model homes. Many of these homes will have the latest and most updated trends. When we were looking to build our TX kitchen, this is exactly what we did.
Here’s a picture of our inspiration kitchen from a model home along with a pic of our completed kitchen.
Lessons Learned – Changes to Make in our Lake House Remodel
Our lake home is much smaller and a different price point than our TX home. So, we will definitely keep this in mind when making our selections. The last thing we want to do is price ourselves out of the neighborhood when it does come time to sell.
Most of the changes that we are planning are aimed at being more cost efficient. (Have I already mentioned the increased price of lumber? Ha! Ha!)
- We will have our custom cabinets built on-site instead of at a cabinet maker’s workshop – They will be less expensive.
- No soft close hinges – These weren’t worth the money for the extra expense.
- No pot filler – I usually forgot that I had it. I mean, my sink was right in front of the stove, so why did I really need one?
- No custom spice pull-out drawers – I cook a lot and there wasn’t nearly enough room to keep all my spices organized. And, to have spices in 2 separate drawers was just a bad idea. I tried to alphabetize them but was always searching both drawers to find what I needed.
- No small drawers underneath the spice pull-outs – These drawers weren’t big enough to really house anything. Although they looked nice, they were really expensive for not much function.
- A different farmhouse sink. I LOVED the large farmhouse sink with the single basin, except that it was flat on the bottom and didn’t drain well. I ended up purchasing a squeegee just to remove the water and debris from the bottom of the sink every time I rinsed a dish. This was exhausting and I know there has to be one with a better design.
- Quartzite island – While this was absolutely beautiful, we discovered that we had to be careful about what was placed on it. Sometimes even a water glass would leave a ring. We ended up purchasing many coasters for the island and always made sure that no glass or dish touched it directly. This was too much stress and I don’t want to have this worry at our lake house. We are continuing to research alternative products for our island.
- Granite countertops – There are many builder grade granite countertops that look fabulous for a much lower price. Since we are no longer in the Dallas market, we will most likely go with 2 cm granite and a less expensive slab.
- Range selection – I loved everything about my Thermador range except for the price. I am hoping to find a similar gas range that looks nice but is more budget friendly. A professional range isn’t really necessary at a lake home when I’m just cooking for 2 of us.
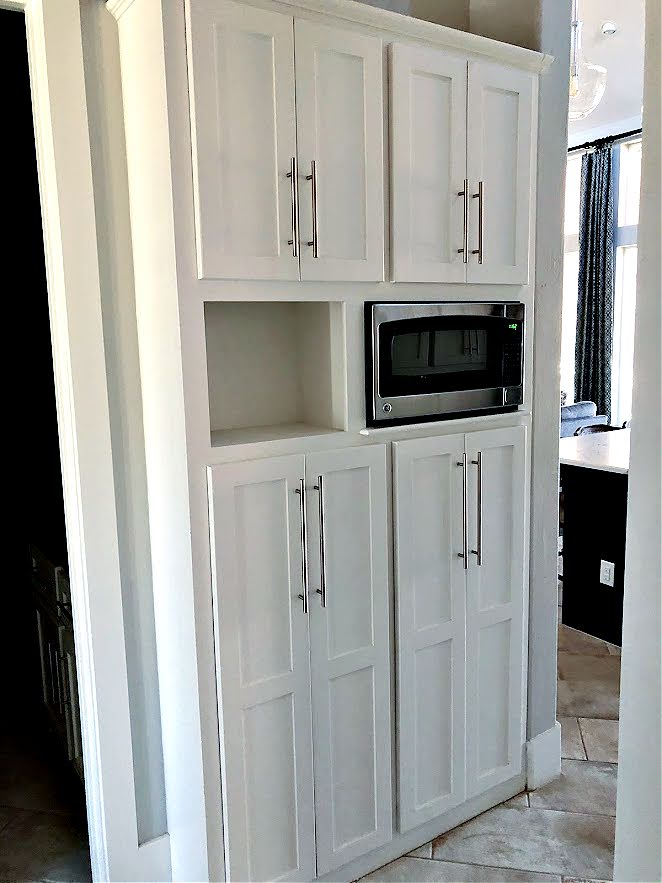
- Size of the cabinets under the microwave – I had planned on using this bank of cabinets for storage of small appliances. However, they weren’t deep enough. They were only about 11 inches deep and not that useful. For our Oklahoma kitchen, I want to pay more attention to ensuring that the inside size of cabinets is appropriate for their intended use.
- Cabinet color – While we love the neutral white and black colors that we used in the kitchen, we want something a little different in the new kitchen. The color blue is making quite an appearance in kitchens today. I’ve even heard that Navy is the new neutral. I have my eye on the 2020 Sherwin Williams color of the year – Naval. I’ve used it on some furniture redos and I’m in love. So, the color palate of our new kitchen will incorporate both white and navy. (Sorry black, you’ve been replaced with Navy). You will most likely even see some Naval cabinets so stay tuned.
Thanks for taking this trip down memory lane with us. Now we can’t wait to start on our lake kitchen remodel. Hopefully, we’ve given you some kitchen ideas to ponder as you plan your next kitchen!
30 comments
So enjoyed reading your blog. It’s chalked filled with some fabulous tips and tricks!
My hubby Paul n I are pretty particular about our appliances and their value. Kitchen aid has long been a favorite of ours. We had some Subzero and GE appliances that our Texas home came with but we were always frustrated by their issues.
Best of luck with your Kitchen build! ❤️ Have fun with it! 😃 One of my new favorite items in my NC kitchen is our television that doubles as a photo display. Just plug in your thumb drive and display those favorite photos! ❤️ 📸 Priceless!
Looking forward to your updates.
Thanks Suzy! Mike and I have been eyeing a Kitchen Aid range for our lake house. Good to know that it is a favorite of yours! I appreciate you sharing the information.
Hi Dawn! I’m so impressed with your blog and enjoying humor! We moved into our new home a few months ago. We chose the Naval color for our lower kitchen cabinets and are very happy with it! Go for it!
That’s what I’ve been thinking about doing – the Naval on my lowers and island. So glad that you like it. Thanks for reading my blog!
Gorgeous kitchen layout choices and aesthetic! LOVE IT! I love smart useful decisions to make us all more efficient. We too had an Amish cabinet maker custom make our cabinetry. It makes all the difference!
Beautiful!
Your kitchen is 100% goals!! love it!!
Great tips! I LOVE the clocks!! And your flooring. So pretty! Thanks too for including the tips at the end. It’s good to know some of those “extras” just aren’t worth it.
Such a beautiful kitchen and great information!
I love your take on remodeling. Very practical to follow. I enjoyed reading what you would do different in your next home. I will consider the depths of the cabinets, we are just building and haven’t started on that yet!
My goodness, you’ve inspired me to dream big! <3
Your kitchen is AMAZING!! Very practical tips to remodeling you’ve given here.
I love your kitchen! Unfortunately, I have a galley kitchen so I will need a whole new house! lol
You have great taste in design. https://tammyhorvath.com/blog
The kitchen is stunning and looks like it belongs in a magazine.,
Love the exposed beams. I’m obsessed with home Reno shows and all of these suggestions are super important especially for resale. Thanks for sharing this 😊
You are going to love that big island. Picture of the Elf on the Shelf is priceless.
Love your taste! I get to overwhelmed picking things. My interior design friend said that I’m the worst type of client! LOL
Those cabinets! I love the spice and the narrow utensil cabinets the most. Beautiful and functional!
Very nice! Such a beautiful home!
Wow! Your home is just stunning. I love the exposed beams and how you made the cabinets taller and more custom. I want one of those pull out trashcans. 🙂
What a wonderful job done! I thoroughly enjoyed the photos and coming along on your fixer upper rehab journey
Love the cutlery and utensil drawer! Great idea!!
Your kitchen sounds amazing. Designing our dream kitchen is what I look forward to most when we get the homestead.
It’s fun remodeling, isn’t it? The newer ideas for space saving storage are great. Thank you for supporting the economy!
What a gorgeous kitchen! We have upgraded ours, but really can’t change the layout. I am happy with it, even though it is pretty small.
What great ideas! Love the look – my kitchen is a rich brown right now – might have to go lighter next time!
Love your cutlery and utensil draw. Beautiful kitchen & full of light too!
Beautiful! And I love all the storage and custom spaces. Your kitchen is perfect.
Beautiful!